
How To Fix A Blank Screen When Booting RetroPie
Booting up RetroPie and being presented with a blank screen is an issue I have encountered on a number of occasions. Unfortunately finding a solution proved to be a little more troublesome than I expected, so I decided to write this article in case anyone else finds themselves in this unfortunate predicament.
Depending on the display you are using to run RetroPie (and the fact that you’ve arrived at this page) it is entirely possible that you, like me, have encountered a blank screen when booting up. To be more specific what is actually occurring is your display is not detecting the signal from the Raspberry Pi and therefore is not showing any image on the screen. Instead you are seeing a black screen because the display you are using doesn’t think there is anything to show. Here we will investigate this infuriating issue in more detail and explore a few possible solutions.
Why is this happening?
The reason this issue is occuring is most likely down to your display and not your Raspberry Pi or RetroPie, however when troubleshooting it is important to eliminate the simple solutions first before getting your hands really dirty and delving into the backend code.
It is possible that the issue may have developed during software installation. Perhaps the RetroPie files became corrupted when they were downloaded, or maybe the fault occurred when you burnt RetroPie onto the micro SD card. Either way, to make sure that none of these were at fault the best thing to do is repeat the processes you performed earlier. Download RetroPie again from the RetroPie website and then Flash the image to your micro SD card. If the process was corrupted before it is likely that going through it again will fix the issue and you should be able to boot up RetroPie without any further issues.
If the problem still persists you can rest in the knowledge that it is not your software that is causing the issue. Eliminating this possibility will allow you now to concentrate on other potential issues such as your display.
Firstly, to determine whether or not it is your display that is causing the issue the best thing to do is to try your setup with another display. If the issue occurred while using a normal TV it would be advisable to try using a computer monitor. When my issue originally occurred the display I was using was a Sony Bravia KDL-32S2510 which was bought way back in 2005. Switching the display to a Dell computer monitor identified to me that it was my TV that was the issue as there were no problems running RetroPie when using the monitor.
How To Resolve the Blank Screen Issue
So, you have determined that it is your display that is causing the issue. OK, there are a number of possible solutions to this issue. Not all will be successful but hopefully at least one will be.
All these solutions will lie in amending the settings within the config.txt file, which can be found in the route of your micro SD card. This may sound a bit intimidating at first but it is really very simple. It is basically a trial and error process to determine which settings work best for your display.
First off, lets gain access to the config.txt file by following the steps below.
- Insert the micro SD card into your computer
- Using a file navigation application such as Windows Explorer, or Finder on a Mac, navigate to the micro SD card.
- In the route of the micro SD card you will find the config.txt file. Double click on it to open it.
- You can now make any amendments you need, just remember to save the changes before you exit the application.
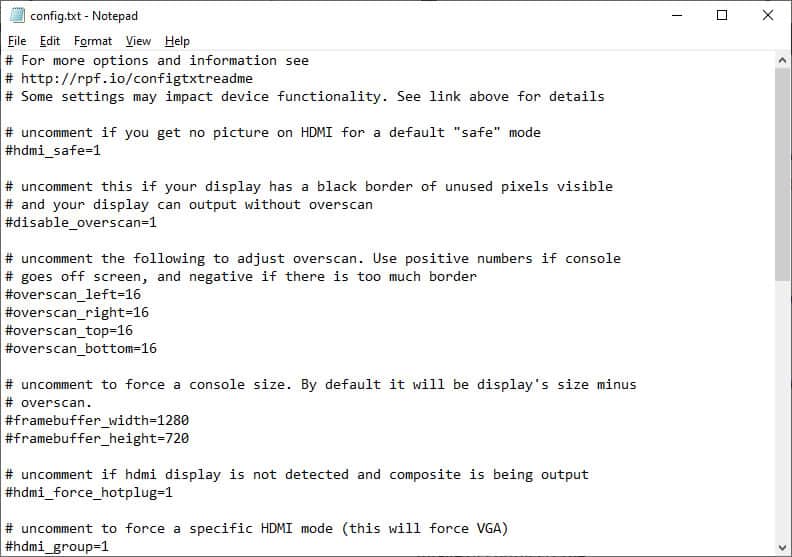
The first thing we need to do is to get RetroPie working on your display. The surest way to do this is to enable safe mode in the config.txt file. To do this, at around line 4 you will see the code below –
# uncomment if you get no picture on HDMI for a default "safe" mode

#hdmi_safe=1
Simply delete the hashtag that precedes ‘hdmi_safe=1’ so the text should now read as below. This is what’s called uncommenting and it allows the computer to see the line of code. Replacing the hashtag will comment the line out again meaning the computer will skip it.
# uncomment if you get no picture on HDMI for a default "safe" mode

hdmi_safe=1
Now save the file, remove the micro SD card from your computer and insert it back into the Raspberry Pi. Boot up the Raspberry Pi to make sure that you now see the RetroPie loading screen and the subsequent menu screen.
When you enable safe mode you are basically telling RetroPie to render to it’s lowest possible settings. In other words the settings you have configured are the most basic to display and if they are not now showing on your display, then you should probably look at upgrading your device.
When you do see an image on your display, you will probably notice that it is at a very low resolution (640×480 to be precise). I know it looks bad, but this is ok for the time being. We now know that your display is capable of rendering RetroPie in some way. What we now need to do now is work out the best resolution that your display is capable of rendering.
How To Work Out The Best Quality For Your Display
As I mentioned before, this will be a process of trial and error. When you activated safe mode you basically set up a specific configuration to the settings you will now be experimenting with. To put it another way activating safe mode is the same as the configuration below:
hdmi_force_hotplug=1
hdmi_drive=2
hdmi_group=1
hdmi_mode=1
So, the next thing you need to do is to turn off safe mode by reverting your previous action and commenting out the line again.
# uncomment if you get no picture on HDMI for a default "safe" mode

#hdmi_safe=1
Next search the config.txt file for the line that reads #hdmi_force_hotplug=1. When uncommented this line tells the Raspberry Pi that an HDMI device is always attached. Uncomment this line by deleting the hashtag and try booting the Raspberry Pi again.
If the above test does not work it may be because the HDMI signal coming from the Pi is too weak. Thankfully there is an option available to boost it. In the config.txt file find the line that reads #config_hdmi_boost=4. Uncomment this line and increase the value to 9 as seen below.
config_hdmi_boost=9
This is the highest value you can set this option to, and it basically increases the strength of the hdmi signal.
If RetroPie is still not displaying for you after this test, don’t worry. There are a few more avenues to explore before we give up, and this next solution is more likely to be successful as it worked for me.
With the hdmi_force_hotplug=1 line still uncommented (no hashtag at the beginning of the line) search through the rest of the config.txt file to find the lines of code below:
#hdmi_drive=2
#hdmi_group=1
#hdmi_mode=1
Uncomment these lines of code. You may notice that your config.txt file is now configured to run as it did in safe mode (as mentioned earlier in this article). This is correct but we will be making a few more amendments before we test again. The next amendments, however will depend on your setup.
The hdmi_group specifies whether your display is DMT type (a computer monitor) or CEA type (a TV) so you will need to change the value accordingly. I needed to connect up to a TV so I configured the setting to 1. If you are using a computer monitor you should set hdmi_group to 2.
If you are using a TV
hdmi_group=1If you are using a computer monitor
hdmi_group=2The next setting you will need to configure is the hdmi_mode which specifies the resolution of your display. There are a plethora of options available here so the best thing to do is to select the one that corresponds best to your display.
Below you will see two tables which outline a few of the different options available to you. These tables are just a highlight of the options available and feature those settings most commonly used. If none of these match the configuration of your display you can view the full tables in the appendix at the end of this article.
| hdmi_mode | Resolution | Frequency | Screen Aspect | Comments |
|---|---|---|---|---|
| 3 | 480p | 60Hz | 16:9 | |
| 4 | 720p | 60Hz | 16:9 | |
| 5 | 1080i | 60Hz | 16:9 | |
| 16 | 1080p | 60Hz | 16:9 | |
| 19 | 720p | 50Hz | 16:9 | |
| 20 | 1080i | 50Hz | 16:9 | |
| 31 | 1080p | 50Hz | 16:9 | |
| 39 | 1080i | 50Hz | 16:9 | reduced blanking |
| hdmi_mode | Resolution | Frequency | Screen Aspect | Comments |
|---|---|---|---|---|
| 23 | 1280×768 | 60Hz | 15:9 | |
| 24 | 1280×768 | 75Hz | 15:9 | |
| 25 | 1280×768 | 85Hz | 15:9 | |
| 28 | 1280×800 | 60Hz | 16:10 | |
| 29 | 1280×800 | 75Hz | 16:10 | |
| 30 | 1280×800 | 85Hz | 16:10 | |
| 35 | 1280×1024 | 60Hz | 5:4 | |
| 36 | 1280×1024 | 75Hz | 5:4 | |
| 37 | 1280×1024 | 85Hz | 5:4 | |
| 39 | 1360×768 | 60Hz | 16:9 | |
| 47 | 1440×900 | 60Hz | 16:10 | |
| 48 | 1440×900 | 75Hz | 16:10 | |
| 49 | 1440×900 | 85Hz | 16:10 | |
| 58 | 1680×1050 | 60Hz | 16:10 | |
| 59 | 1680×1050 | 75Hz | 16:10 | |
| 60 | 1680×1050 | 85Hz | 16:10 | |
| 69 | 1920×1200 | 60Hz | 16:10 | |
| 70 | 1920×1200 | 75Hz | 16:10 | |
| 77 | 2560×1600 | 60Hz | 16:10 | |
| 82 | 1920×1080 | 60Hz | 16:9 | 1080p |
| 85 | 1280×720 | 60Hz | 16:9 | 720p |
Once you know which setting best suits your display you can enter that into the code. For me my TVs optimum resolution was 720p with a refresh rate of 60Hz, so the best setting for me was 4.
hdmi_mode=4My Sony Bravia is an HD ready TV theoretically capable of rendering a resolution of 1080i, however when I configured the code to that setting (hdmi_mode=5) I got the same results as I had previously… a blank screen. Reducing the resolution to 720p (hdmi_mode=4) seemed to do the trick.
How To Remove The Black Border From Your Display
Ok, so you’ve now determined the optimum resolution which your display can render. Fantastic! This may be all you need to do. However in some cases there is the presense of an unsightly black border around your screen. If you are seeing a similar issue don’t worry, it should be easy to resolve.
The first thing to try here is to amend the disable_overscan setting in the config.txt file. Search for the line of code (this should be line 10) that reads #disable_overscan=0 and uncomment it by removing the hashtag as shown below:
disable_overscan=0This change will disable the default values of overscan that is set by the Raspberry Pi firmware and should theoretically remove the black borders.
If this method does not work another option is to play with the overscan_left, overscan_right, overscan_top and overscan_bottom settings. The value on all four of these settings specifies the number of pixels to add or remove to the firmware default value of overscan. Using this method to remove my black borders, my code was configured as below:
overscan_left=-30

overscan_right=-30

overscan_top=-35

overscan_bottom=-35
If you are using this method to correct the black border, as opposed to the disable_overscan method, make sure the disable_overscan line is commented out as demonstrated below:
#disable_overscan=1Related Questions
Where can I find more information on this issue? Hopefully I have manged to answer all your questions and resolve your issue, however if you feel the need to investigate this issue deeper you can find some valuable information in the sites listed below:
- https://www.raspberrypi.org/forums/viewtopic.php?t=34061
- https://www.thegeekyway.com/connect-raspberry-pi-vga-monitortv/
- https://elinux.org/R-Pi_Troubleshooting
- https://www.raspberrypi.org/documentation/configuration/config-txt/video.md
- https://retropie.org.uk/forum/topic/26018/black-screen-when-plugged-to-tv
- https://github.com/RetroPie/RetroPie-Setup/wiki/Video-Issues
- https://elinux.org/RPiconfig#Video_mode_options
Appendix
Below you will find the full version of the highlight tables referenced earlier in this article.
| hdmi_mode | Resolution | Frequency | Screen Aspect | Comments |
|---|---|---|---|---|
| 1 | VGA (640×480) | 60Hz | 4:3 | |
| 2 | 480p | 60Hz | 4:3 | |
| 3 | 480p | 60Hz | 16:9 | |
| 4 | 720p | 60Hz | 16:9 | |
| 5 | 1080i | 60Hz | 16:9 | |
| 6 | 480i | 60Hz | 4:3 | |
| 7 | 480i | 60Hz | 16:9 | |
| 8 | 240p | 60Hz | 4:3 | |
| 9 | 240p | 60Hz | 16:9 | |
| 10 | 480i | 60Hz | 4:3 | pixel quadrupling |
| 11 | 480i | 60Hz | 16:9 | pixel quadrupling |
| 12 | 240p | 60Hz | 4:3 | pixel quadrupling |
| 13 | 240p | 60Hz | 16:9 | pixel quadrupling |
| 14 | 480p | 60Hz | 4:3 | pixel doubling |
| 15 | 480p | 60Hz | 16:9 | pixel doubling |
| 16 | 1080p | 60Hz | 16:9 | |
| 17 | 576p | 50Hz | 4:3 | |
| 18 | 576p | 50Hz | 16:9 | |
| 19 | 720p | 50Hz | 16:9 | |
| 20 | 1080i | 50Hz | 16:9 | |
| 21 | 576i | 50Hz | 4:3 | |
| 22 | 576i | 50Hz | 16:9 | |
| 23 | 288p | 50Hz | 4:3 | |
| 24 | 288p | 50Hz | 16:9 | |
| 25 | 576i | 50Hz | 4:3 | pixel quadrupling |
| 26 | 576i | 50Hz | 16:9 | pixel quadrupling |
| 27 | 288p | 50Hz | 4:3 | pixel quadrupling |
| 28 | 288p | 50Hz | 16:9 | pixel quadrupling |
| 29 | 576p | 50Hz | 4:3 | pixel doubling |
| 30 | 576p | 50Hz | 16:9 | pixel doubling |
| 31 | 1080p | 50Hz | 16:9 | |
| 32 | 1080p | 24Hz | 16:9 | |
| 33 | 1080p | 25Hz | 16:9 | |
| 34 | 1080p | 30Hz | 16:9 | |
| 35 | 480p | 60Hz | 4:3 | pixel quadrupling |
| 36 | 480p | 60Hz | 16:9 | pixel quadrupling |
| 37 | 576p | 50Hz | 4:3 | pixel quadrupling |
| 38 | 576p | 50Hz | 16:9 | pixel quadrupling |
| 39 | 1080i | 50Hz | 16:9 | reduced blanking |
| 40 | 1080i | 100Hz | 16:9 | |
| 41 | 720p | 100Hz | 16:9 | |
| 42 | 576p | 100Hz | 4:3 | |
| 43 | 576p | 100Hz | 16:9 | |
| 44 | 576i | 100Hz | 4:3 | |
| 45 | 576i | 100Hz | 16:9 | |
| 46 | 1080i | 120Hz | 16:9 | |
| 47 | 720p | 120Hz | 16:9 | |
| 48 | 480p | 120Hz | 4:3 | |
| 49 | 480p | 120Hz | 16:9 | |
| 50 | 480i | 120Hz | 4:3 | |
| 51 | 480i | 120Hz | 16:9 | |
| 52 | 576p | 200Hz | 4:3 | |
| 53 | 576p | 200Hz | 16:9 | |
| 54 | 576i | 200Hz | 4:3 | |
| 55 | 576i | 200Hz | 16:9 | |
| 56 | 480p | 240Hz | 4:3 | |
| 57 | 480p | 240Hz | 16:9 | |
| 58 | 480i | 240Hz | 4:3 | |
| 59 | 480i | 240Hz | 16:9 | |
| 60 | 720p | 24Hz | 16:9 | |
| 61 | 720p | 25Hz | 16:9 | |
| 62 | 720p | 30Hz | 16:9 | |
| 63 | 1080p | 120Hz | 16:9 | |
| 64 | 1080p | 100Hz | 16:9 | |
| 65 | Custom | |||
| 66 | 720p | 25Hz | 64:27 | Pi 4 |
| 67 | 720p | 30Hz | 64:27 | Pi 4 |
| 68 | 720p | 50Hz | 64:27 | Pi 4 |
| 69 | 720p | 60Hz | 64:27 | Pi 4 |
| 70 | 720p | 100Hz | 64:27 | Pi 4 |
| 71 | 720p | 120Hz | 64:27 | Pi 4 |
| 72 | 1080p | 24Hz | 64:27 | Pi 4 |
| 73 | 1080p | 25Hz | 64:27 | Pi 4 |
| 74 | 1080p | 30Hz | 64:27 | Pi 4 |
| 75 | 1080p | 50Hz | 64:27 | Pi 4 |
| 76 | 1080p | 60Hz | 64:27 | Pi 4 |
| 77 | 1080p | 100Hz | 64:27 | Pi 4 |
| 78 | 1080p | 120Hz | 64:27 | Pi 4 |
| 79 | 1680×720 | 24Hz | 64:27 | Pi 4 |
| 80 | 1680×720 | 25z | 64:27 | Pi 4 |
| 81 | 1680×720 | 30Hz | 64:27 | Pi 4 |
| 82 | 1680×720 | 50Hz | 64:27 | Pi 4 |
| 83 | 1680×720 | 60Hz | 64:27 | Pi 4 |
| 84 | 1680×720 | 100Hz | 64:27 | Pi 4 |
| 85 | 1680×720 | 120Hz | 64:27 | Pi 4 |
| 86 | 2560×720 | 24Hz | 64:27 | Pi 4 |
| 87 | 2560×720 | 25Hz | 64:27 | Pi 4 |
| 88 | 2560×720 | 30Hz | 64:27 | Pi 4 |
| 89 | 2560×720 | 50Hz | 64:27 | Pi 4 |
| 90 | 2560×720 | 60Hz | 64:27 | Pi 4 |
| 91 | 2560×720 | 100Hz | 64:27 | Pi 4 |
| 92 | 2560×720 | 120Hz | 64:27 | Pi 4 |
| 93 | 2160p | 24Hz | 16:9 | Pi 4 |
| 94 | 2160p | 25Hz | 16:9 | Pi 4 |
| 95 | 2160p | 30Hz | 16:9 | Pi 4 |
| 96 | 2160p | 50Hz | 16:9 | Pi 4 |
| 97 | 2160p | 60Hz | 16:9 | Pi 4 |
| 98 | 4096×2160 | 24Hz | 256:135 | Pi 4 |
| 99 | 4096×2160 | 25Hz | 256:135 | Pi 4 |
| 100 | 4096×2160 | 30Hz | 256:135 | Pi 4 |
| 101 | 4096×2160 | 50Hz | 256:135 | Pi 4 |
| 102 | 4096×2160 | 60Hz | 256:135 | Pi 4 |
| 103 | 2160p | 24Hz | 64:27 | Pi 4 |
| 104 | 2160p | 25Hz | 64:27 | Pi 4 |
| 105 | 2160p | 30Hz | 64:27 | Pi 4 |
| 106 | 2160p | 50Hz | 64:27 | Pi 4 |
| 107 | 2160p | 60Hz | 64:27 | Pi 4 |
| hdmi_mode | Resolution | Frequency | Screen Aspect | Comments |
|---|---|---|---|---|
| 1 | 640×350 | 85Hz | ||
| 2 | 640×400 | 85Hz | 16:10 | |
| 3 | 720×400 | 85Hz | ||
| 4 | 640×480 | 60Hz | 4:3 | |
| 5 | 640×480 | 72Hz | 4:3 | |
| 6 | 640×480 | 75Hz | 4:3 | |
| 7 | 640×480 | 85Hz | 4:3 | |
| 8 | 800×600 | 56Hz | 4:3 | |
| 9 | 800×600 | 60Hz | 4:3 | |
| 10 | 800×600 | 72Hz | 4:3 | |
| 11 | 800×600 | 75Hz | 4:3 | |
| 12 | 800×600 | 85Hz | 4:3 | |
| 13 | 800×600 | 120Hz | 4:3 | |
| 14 | 848×480 | 60Hz | 16:9 | |
| 15 | 1024×768 | 43Hz | 4:3 | incompatible with the Raspberry Pi |
| 16 | 1024×768 | 60Hz | 4:3 | |
| 17 | 1024×768 | 70Hz | 4:3 | |
| 18 | 1024×768 | 75Hz | 4:3 | |
| 19 | 1024×768 | 85Hz | 4:3 | |
| 20 | 1024×768 | 120Hz | 4:3 | |
| 21 | 1152×864 | 75Hz | 4:3 | |
| 22 | 1280×768 | 60Hz | 15:9 | reduced blanking |
| 23 | 1280×768 | 60Hz | 15:9 | |
| 24 | 1280×768 | 75Hz | 15:9 | |
| 25 | 1280×768 | 85Hz | 15:9 | |
| 26 | 1280×768 | 120Hz | 15:9 | reduced blanking |
| 27 | 1280×800 | 60 | 16:10 | reduced blanking |
| 28 | 1280×800 | 60Hz | 16:10 | |
| 29 | 1280×800 | 75Hz | 16:10 | |
| 30 | 1280×800 | 85Hz | 16:10 | |
| 31 | 1280×800 | 120Hz | 16:10 | reduced blanking |
| 32 | 1280×960 | 60Hz | 4:3 | |
| 33 | 1280×960 | 85Hz | 4:3 | |
| 34 | 1280×960 | 120Hz | 4:3 | reduced blanking |
| 35 | 1280×1024 | 60Hz | 5:4 | |
| 36 | 1280×1024 | 75Hz | 5:4 | |
| 37 | 1280×1024 | 85Hz | 5:4 | |
| 38 | 1280×1024 | 120Hz | 5:4 | reduced blanking |
| 39 | 1360×768 | 60Hz | 16:9 | |
| 40 | 1360×768 | 120Hz | 16:9 | reduced blanking |
| 41 | 1400×1050 | 60Hz | 4:3 | reduced blanking |
| 42 | 1400×1050 | 60Hz | 4:3 | |
| 43 | 1400×1050 | 75Hz | 4:3 | |
| 44 | 1400×1050 | 85Hz | 4:3 | |
| 45 | 1400×1050 | 120Hz | 4:3 | reduced blanking |
| 46 | 1440×900 | 60Hz | 16:10 | reduced blanking |
| 47 | 1440×900 | 60Hz | 16:10 | |
| 48 | 1440×900 | 75Hz | 16:10 | |
| 49 | 1440×900 | 85Hz | 16:10 | |
| 50 | 1440×900 | 120Hz | 16:10 | reduced blanking |
| 51 | 1600×1200 | 60Hz | 4:3 | |
| 52 | 1600×1200 | 65Hz | 4:3 | |
| 53 | 1600×1200 | 70Hz | 4:3 | |
| 54 | 1600×1200 | 75Hz | 4:3 | |
| 55 | 1600×1200 | 85Hz | 4:3 | |
| 56 | 1600×1200 | 120Hz | 4:3 | reduced blanking |
| 57 | 1680×1050 | 60Hz | 16:10 | reduced blanking |
| 58 | 1680×1050 | 60Hz | 16:10 | |
| 59 | 1680×1050 | 75Hz | 16:10 | |
| 60 | 1680×1050 | 85Hz | 16:10 | |
| 61 | 1680×1050 | 120Hz | 16:10 | reduced blanking |
| 62 | 1792×1344 | 60Hz | 4:3 | |
| 63 | 1792×1344 | 75Hz | 4:3 | |
| 64 | 1792×1344 | 120Hz | 4:3 | reduced blanking |
| 65 | 1856×1392 | 60Hz | 4:3 | |
| 66 | 1856×1392 | 75Hz | 4:3 | |
| 67 | 1856×1392 | 120Hz | 4:3 | reduced blanking |
| 68 | 1920×1200 | 60Hz | 16:10 | reduced blanking |
| 69 | 1920×1200 | 60Hz | 16:10 | |
| 70 | 1920×1200 | 75Hz | 16:10 | |
| 71 | 1920×1200 | 85Hz | 16:10 | |
| 72 | 1920×1200 | 120Hz | 16:10 | reduced blanking |
| 73 | 1920×1440 | 60Hz | 4:3 | |
| 74 | 1920×1440 | 75Hz | 4:3 | |
| 75 | 1920×1440 | 120Hz | 4:3 | reduced blanking |
| 76 | 2560×1600 | 60Hz | 16:10 | reduced blanking |
| 77 | 2560×1600 | 60Hz | 16:10 | |
| 78 | 2560×1600 | 75Hz | 16:10 | |
| 79 | 2560×1600 | 85Hz | 16:10 | |
| 80 | 2560×1600 | 120Hz | 16:10 | reduced blanking |
| 81 | 1366×768 | 60Hz | 16:9 | |
| 82 | 1920×1080 | 60Hz | 16:9 | 1080p |
| 83 | 1600×900 | 60Hz | 16:9 | reduced blanking |
| 84 | 2048×1152 | 60Hz | 16:9 | reduced blanking |
| 85 | 1280×720 | 60Hz | 16:9 | 720p |
| 86 | 1366×768 | 60Hz | 16:9 | reduced blanking |
