How To Add Images and Videos To Your RetroPie Games Lists Using Skyscraper
RetroPie out of the box is an awesome front end management programme for any retro gamer, however it is always nice to jazz up and customise your build a little. One of the best ways to do this is by adding screenshots and videos to your games lists and the most efficient and effective program to use for this is Lars Muldjord’s Skyscraper.
Skyscraper is an optional package in RetroPie that can be easily installed and run through the back-end. Using this package is generally quite simple, however there are a few slightly more complicated procedures that, although not strictly necessary, can help to improve your scraping experience. All of this will be explored in this article, however we do have a lot to cover. You can either read on or feel free to skip to your preferred section using the links below:
- Preparing to install Skscraper
- How to install Skyscraper
- How to startup Skyscraper
- How to configure Skyscraper
- How to scrape your ROMs
Preparing To Install Skyscraper
Ok, so you have decided that you want to scrape your games using Skyscraper. That’s great, but first you need to make sure you have everything you need in order to do this.
First off, you need to make sure that you have a keyboard available. This piece of hardware is unfortunately not optional in this case, as you will need it for more than adding convenience to navigating the back-end menus. Brace yourselves as you will need to do some actual coding in a few minutes.
If the only spare keyboard available to you is firmly tethered to your PC then another option for you is to remotely connect to RetroPie using an SSH application such as PuTTY. If this seems like a better option for you, you can find more information on remotely connecting to your Raspberry Pi by visiting this article.
Secondly it is best practice to make sure that your current version of RetroPie is up to date. At the time of writing, the most recent version of RetroPie is 4.7.8, which is the version that this tutorial will be working to. If you find that any of the menu options mentioned here are slightly inaccurate it would likely be because the options have been changed in a subsequent update. In any case the syntax is unlikely to have changed that much so it should be easy to interpret them. For an in depth tutorial on updating RetroPie check out this article.
How To Install Skyscraper
Before you run Skyscraper you need to install it on your machine. To do this go to the configuration menu in RetroPie and select RetroPie Setup. This will take you to the backend setup screen. From here select Manage packages and then Manage optional packages in the next menu screen.
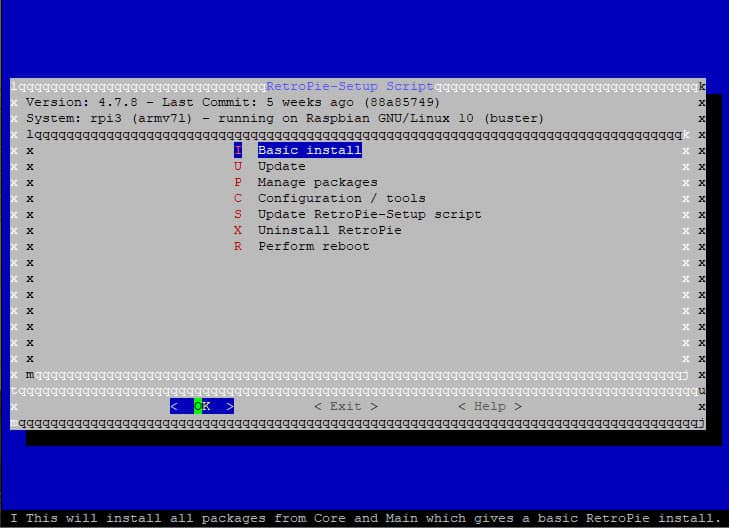
The next screen you see will be a list of all the optional packages available in RetroPie. The option you are looking for is Skyscraper. This will likely be found towards the bottom of the screen so you may want to make use of the PgDn button on your keyboard if you have one connected. Otherwise be prepared for some serious thumb crampage.
After selecting ‘Skyscraper’ you will be taken through to the Skyscraper options screen. Select Install from source and RetroPie will go ahead and install Skyscraper. This can take 10 to 15 minutes depending on the quality of your internet connection, and at times it may look like nothing is happening. Give it time and let it run its course. Once the installation has completed you will be returned to the Skyscraper options screen.
How To Startup Skyscraper
You’d think that, at this point, all you would need to do would be to access the Skyscraper options and then go ahead and scrape your ROMS. Unfortunately it’s a little more complicated than that, as Skyscraper will not function while EmulationStation (which is the user interface of RetroPie) is still running.
Don’t believe me when I tell you that Skyscraper won’t work while EmulationStation is still running? See for yourself by selecting Configuration / options straight after you have installed Skyscraper. You will be presented with a message stating that EmulationStation must be shut down in order for Skyscraper to run. It also gives you instructions on how to access the Skyscraper interface from the command line/terminal. You see? You can trust me 😉
Also don’t worry about making a note of the instructions on the screen. All this will be provided for you later in this article, when it is required.
So how do you shut down EmulationStation but still keep RetroPie running? Well, first of all what you need to do is get back to the RetroPie front end interface by selecting ‘Back’ a number of times and then ‘Exit’. Once you are back in the RetroPie configuration screen hit F4 on your keyboard in order to shut down EmulationStation and bring up the RetroPie terminal which is also referred to as the command line.
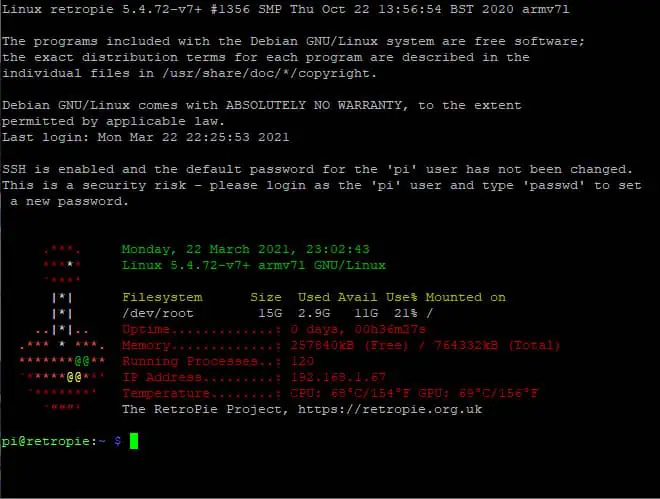
If you don’t have a keyboard connected to your Raspberry Pi and are connecting to RetroPie through an SSH application you can use the command below to close EmulationStation
kill $(pidof emulationstation)From there you can continue as instructed in this tutorial.
Once you have arrived at the terminal, it’s a simple case of entering the line of code below to open the RetroPie setup menu without booting up EmulationStation. Simply type out the following code (remember it is case sensitive so make sure you copy it exactly) and hit enter. As if by magic the setup screen will appear.
sudo RetroPie-Setup/retropie_setup.shNow that you have accessed the setup menu you should follow the same route that you took previously to access the Skyscraper options. That is Manage packages – Manage optional packages – Skyscraper. Again remember that you may need to scroll all the way to the bottom of the Manage optional packages menu to find the Skyscraper item.
In the Skyscraper menu you will see the same options that you did before. If you attempted to enter the Configuration / options item earlier but were kicked out you will be pleased to know that this shouldn’t happen this time. Click on Configuration / Options to set up and run your scrape.
How To Configure Skyscraper
There are a number of options available to you when it comes to running Skyscraper. Some of these are not terribly relevant, however there are several that are quite useful and you’ll be thankful for them after you have spent hours scraping thousands of ROMs. Obviously it is up to you which configuration you go with but let me take you through what your options are and tell you my preferred setup.
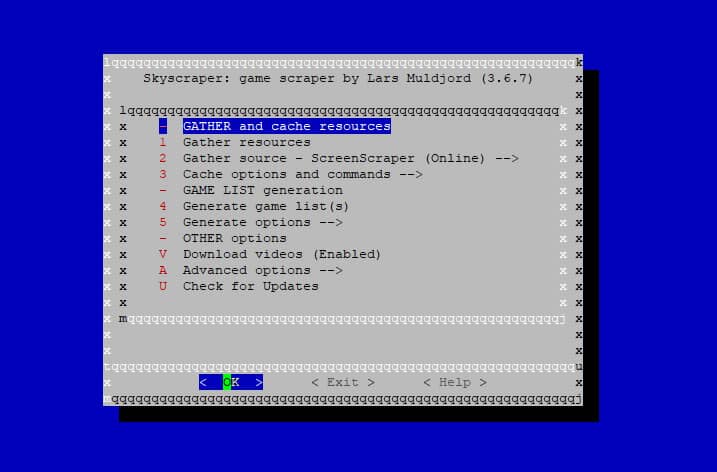
Gather resources
You select Gather Resources when you are ready to scrape your ROMs. At this stage we are not yet ready to scrape our ROMs, so I will delve deeper into this later in the article.
Gather source
Here you select which database you want to scrape all your metadata, images, videos, etc. from. The options available to you are:
- ScreenScraper
- ArcadeDB
- TheGamesDB
- OpenRetro
- World of Spectrum
- EmulationStation Gamelist (local source)
- Import folder from your local machine
Without question I always select ScreenScraper. The reason behind this is that ScreenScraper is by far the most comprehensive, accurate and up to date database out there. It is also a lot more stable than many of the other databases and although it does suffer from server overload at times, it is still way out in front of the pack.
Cache options and commands
When scraping, Skyscraper creates a local cache store of each ROM it scrapes so that the information is available to RetroPie without having to retrieve it online. The cache options and commands screen give you some say on what files are stored in the cache. Don’t think you’ll be using marquees or scroll wheels in your build? Then don’t worry about caching them and save more storage space for ROMs. I personally leave all these options at their default setting. You never know when you may need them.

In this screen you also have the option to enable the ‘Scrape only missing’ functionality. This is useful if for example, you are performing a second scrape since you have added extra ROMs. With Scrape only missing enabled Skyscraper will not waste time parsing over already scraped ROMs and will only retrieve information and media for those ROMs which have not yet been scraped.
Also on this screen you will find the cache purging commands. Over time it is likely that the number of files in your cache will grow and eventually consume a large amount of storage space. You can find out how large your cache store is by looking to the top of this menu. Below is an explanation for each purging option:
- Vacuum chosen platform – allows you to delete any cache files that are no longer associated with any ROM files. Very useful if you have deleted any ROMs.
- Purge chosen platform – delete locally cached resources on a platform by platform basis
- Purge all platforms – the big one! This option removes all locally cached resources from all platforms
N.B. Make sure that you are positive you want to delete your cached files before making use of these purging options. Once activated the purges cannot be undone and your only course of action to get back to where you were would be to rescrape the associated ROMs.
Generate game lists
After you have gathered the resources for your ROMs you need to create a game list in order to complete the scraping process. Again we are not yet at that stage so we will go into this later.
Generate options
This screen presents you with a list of options which govern how the games lists will be generated. You can choose to display your ROMs by file name or by source name. If you choose to display the ROMs file name you then have the option to remove any bracketed text from the name by enabling ‘Remove bracket info’. For example, if you had the ROM file, Action Fighter (USA, Europe).sms (an awesome little game on the Sega Master System by the way) with Remove bracket info enabled the ROM name would display as Action Fighter in the EmulationStation game list. My preference for these options is to stick with source names to avoid any complications.
The third option on this screen is an important one. ‘Use ROM folders for game list & media’ dictates whether the scraped files are stored with your ROM files or in the EmulationStation configuration folder. The reason this option is important is that if you have a large number of ROMs to scrape, then you will want the large number of scraped files to be stored in a location that has a large storage capacity.
I always enable Use ROM folders for game list & media! For one reason, it keeps the scraped files well organised and easily accessible. Secondly, the EmulationStation configuration folder always resides on the micro SD card. You don’t really want your scraped files taking up the limited storage space available here, so if you have, or plan to set up an external storage device to keep your ROMs on, then this is the perfect location to store your scraped files.
Download videos
A pretty self explanatory option here. Do you, or do you not want to download video snaps for your ROMs? I always enable this option unless my storage capacity is limited.
Advanced options
As the option title suggests, this option takes you through to the advanced options screen where you are able to manually edit a number of important files including config.ini and artwork.xml. As I’m sure you can imagine, you could write an entire book on techniques to amending and editing these files so I won’t go any deeper into this at this point. Suffice to say, these options are quite advanced so I generally leave them to their default configurations, unless mentioned later in this article.
Check for updates
The final option in this list and a very simple one. Select this option to make sure that you are running the most recent version of Skyscraper. If you are not, go ahead and update it.
How To Scrape Your ROMs
Now that your options are all configured it is finally time to scrape your ROMs, and this thankfully is a very simple process. Remember the Gather resources option that we skipped over in the configuration section above? Well, now it is time to select it. Once there you are presented with a list of all the platforms available to be scraped.
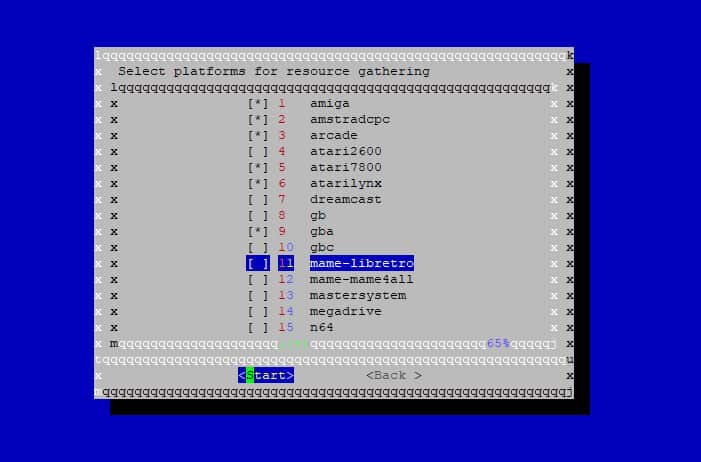
Select each platform that you want to scrape by highlighting the platform and pressing the spacebar. If you select a platform by accident you can deselect it by pressing the spacebar again. Once you are happy with your selection, highlight start at the bottom, press Enter and let Skyscraper do it’s thing.
If like me you have a huge number of ROMs to scrape it is a good idea to perform the scrape in sections. Don’t just select every platform available and hit start. Select a small section of platforms (perhaps all those beginning with the same letter, or the first 3 in the list, and so on) get those scraped and continue from there, again in small sections. The reason behind this is that the more ROMs you have, the longer the scraping process will take. It can take several hours to scrape roughly a thousand ROMs, during which time errors may occur. You may lose your internet connection or spill an entire take away curry over your machine (this hasn’t ever happened to me). If your scrape fails midway through it can prove very difficult to work out which point you got up to and how many platforms were completely scraped. Scrape in small pockets, then you know exactly what you’ve done and how much you have left to do.
As mentioned earlier, the scraping process can take a bit of time depending on the number of ROMs you are scraping. One good thing about Skyscraper is that when it is performing the scrape, the screen displays a range of statistics and figures that relay a wealth of information to you. Among other things, you can work out what is currently being scraped, how the scrape is going and how many more ROMs are left to be scraped. The image below illustrates some of these tidbits of information on show.
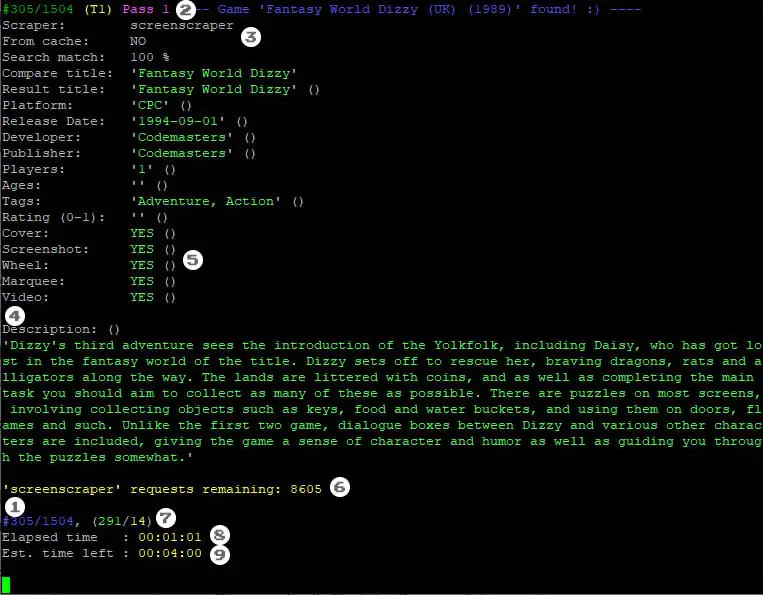
Hover your mouse over the points below to highlight them in the image
- Scrape progress – tells you how many ROMs have been scraped so far and how many ROMs in total are to be scraped for that platform.
- Game title – pretty straight forward. The title of the ROM currently being scraped.
- Game info – a list of some useful info on the game currently being scraped.
- Game description – a description of the game currently being scraped. This will appear in the EmulationStation game menu if your theme accommodates it.
- Available media – tells you what media is available to be scraped for that ROM.
- Number of scrape requests remaining for that day – the number of scrape requests you have remaining for that day. Once this reaches zero you will need to wait until the next day for it to refresh.
- Successful ROM scrapes vs unsuccessful ROM scrapes – the number of ROM scrapes that have succeeded along with those that have failed.
- Scrape time taken on this platform so far – the amount of time spent scraping the current platform.
- Estimated time left to scrape this platform – the estimated amount of time it will take to finish scraping the current platform.
Once the scraping process has finished you are presented with a completion report and are then returned to the Skyscraper configuration / options screen. You have one final task to do before you can view your scraped ROMs in all their glory. In the configuration screen select the Generate game list option. You will then see a screen very similar to the Gather resources screen, a list of all the available platforms to create a game list for. As you did in the Gather resources screen, select all the platforms that you have just scraped using the spacebar to select them. Then select start and once again let Skyscraper work it’s magic.
And that’s all there is to it. Once the Gather Resources operation has completed (it shouldn’t take very long, a few minutes at most) the scraping process is complete. Return to the RetroPie terminal by selecting Back/Exit a few times, and then reboot EmulationStation simply by typing emulationstation. Now bask in the glory of what you have just created. A new look to your retro gaming machine which offers so much more than it did before and hopefully helps to make your life that little bit sweeter.
Related Questions
Why do my Skyscraper scrapes keep failing? If you are finding that you get kicked out of your scraping stream midway through the process it’s likely to be as a result of not registering with the ScreenScraper website and linking your user account to Skyscraper. Setting this up as well as more tips on improving your chances of a successful scrape are explained in this article.
Are there any other scrapers available for RetroPie? Although I regard Skyscraper as being the best ROM scraper currently available, there are a few alternatives. Of course RetroPie itself includes a native scraper which is slightly more basic but nonetheless useful. Other alternatives are Steven Selph’s Scraper as well as Skraper which is developed by the same guys that develop ScreenScraper and runs on your PC.
