How to Setup RetroArch on Windows 10 – A Step by Step Guide
Turning your PC into a retro gaming machine by adding RetroArch to it is quite simple. In this post we will walk you through with an in depth guide to the procedure, but to start with here are the basic steps:
- Download RetroArch from the RetroArch website.
- Extract and install RetroArch on your machine.
- Configure your controller.
- Update essential files.
- Install cores/emulators to RetroArch.
- Add ROMs.
- Play the games.
Now let’s go through these steps in greater detail
Download RetroArch
Obviously in order to install RetroArch you will first need to download it. You can do this at the official RetroArch site. Once you reach this page scroll down to find the Windows box where you are presented with a number of options for installing RetroArch. You can either download the installer (click the Installer link) which does most of the work for you but also removes many of the customisable options, or you can download the install files (click the Download link) which is also a very simple process but allows for more customisation. In this guide we will be going through the Download method, so click on the appropriate download link and save the file.

You also need to select the correct link based on your system type. Are you using a 32-bit or a 64-bit operating system? To find this out open Windows Explorer and right click on ‘This PC’ in the Navigation pane on the left. Select Properties from the pop-up menu to open the System window. Here you can find out your System type.
The file will be saved to your computer’s Downloads folder unless you have specified otherwise.
Extract and Install RetroArch on your Machine
Once the RetroArch file has been downloaded you will need to extract it. The file downloaded is a .7z (7-zip) format so you will need WinRAR or 7-zip in order to extract it. 7-zip is the preferred method in this case as it is free to download and can be done so by visiting the 7-zip website. Once you have either WinRAR or 7-zip you can go ahead and extract the RetroArch download files by right clicking on the .7z file and selecting ‘Extract to “RetroArch”’. You will then see a few progress bars fill up before the process completes and a folder named RetroArch has been created in your Downloads folder. When this process has completed you should choose a more permanent location to store your program files. Select a location and cut and paste the new RetroArch folder to this location.
It is recommended that you keep RetroArch in the route of your hard drive. While it is possible to add the application to deeper nested folders, issues can occur with administrator permissions which can cause elements like fonts and assets to fail to display. This can seriously impact the user experience of the program. In most cases you should extract to your local C:\ drive.
With RetroArch now ready run, navigate to the RetroArch folder and scroll down until you come to the RetroArch executable file (retroarch.exe). Double click this file to run the application.
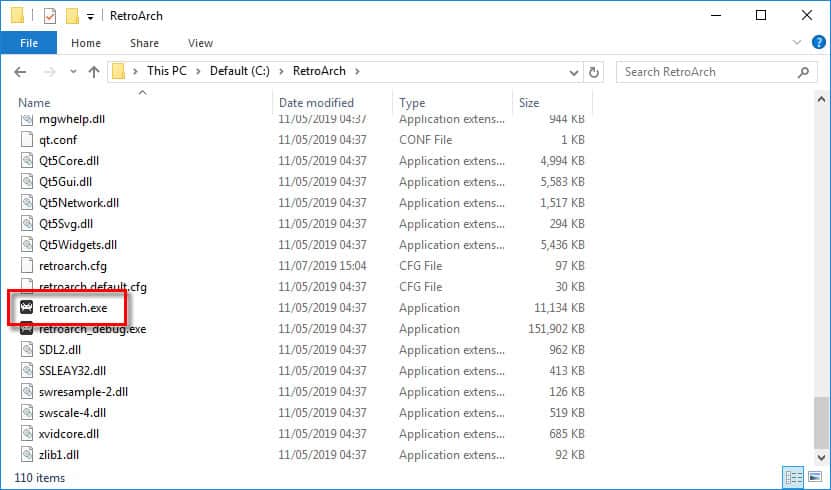
It is likely that you will be using RetroArch quite a lot in the future. In this case it would be a good idea to setup a shortcut so that you don’t have to navigate to the RetroArch folder every time. To do this simply click and drag the Retroarch.exe file down to your Windows Task Bar. This will pin a shortcut link to your task bar making it easy to open RetroArch without having to open Windows Explorer and navigate to the files.
Configure Your Controllers
Navigating around RetroArch can be done in many ways such as using a mouse and with the direction buttons on the keyboard, however the easiest way to do this would be by using a your controller.
Generally, RetroArch automatically configures your controller as soon as you connect it/plug it in. However there have been cases where the controller does not function out of the box and a manual configuration is required. Even if your controller does automatically configure you may not be happy with the default settings. In either case it is quite simple to manually configure your controller in RetroArch.
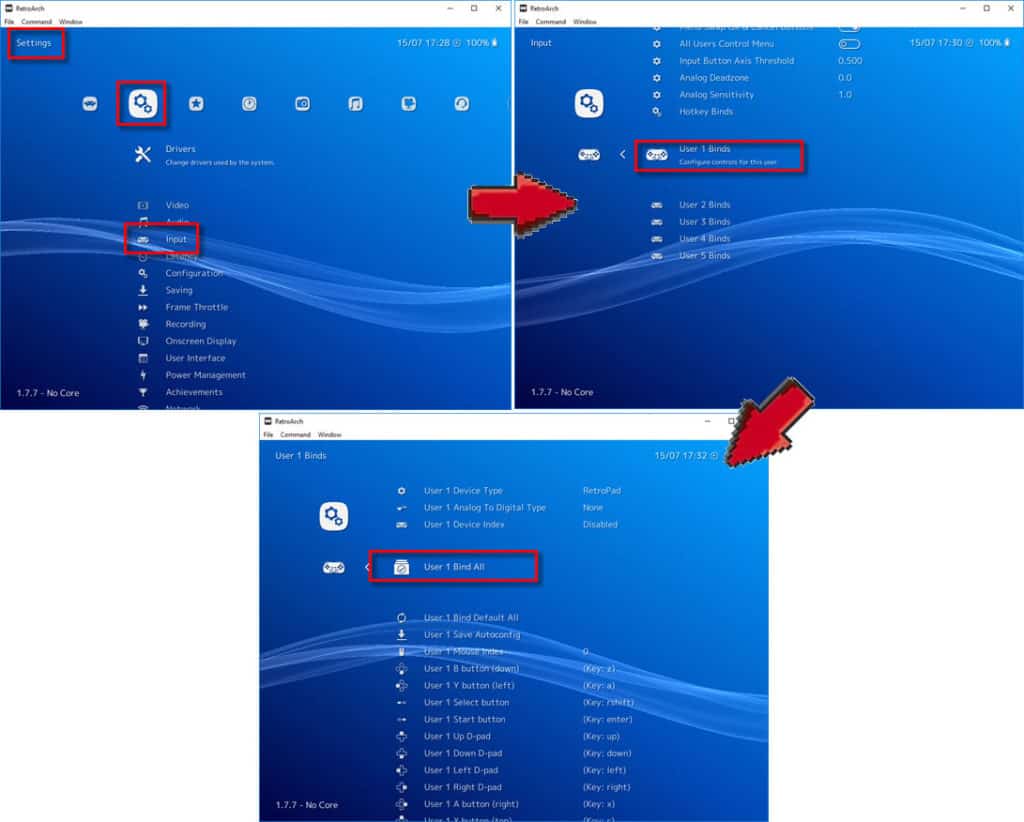
Go to the ‘Settings’ menu in RetroArch and select ‘Input’. Here you can configure the controls for any user/player. To configure the controls for user 1 scroll down and select ‘Port 1 Binds’. Next select ‘Bind All’. You will then be taken through a series of steps to map all your controller buttons.
If RetroArch asks you to map a button that you don’t have on your controller, just leave it blank by not pressing anything until the process moves on to the next button.
Also, if you miss one of the configuration steps or you map a button incorrectly don’t worry. You can map the buttons individually if you like. In the ‘User 1 Binds’ menu simply scroll below the ‘User Bind All’ menu item to see a list of all the individual buttons available for mapping.
Update Essential Files
This is not a crucial step, but it is generally good practice and makes sure that you are accessing the most up to date versions available when setting up RetroArch. The process for updating the files is a very straight forward; simply select ‘Online Updater’ in the main menu, then highlight ‘Update Core Info Files’ and hit enter. You should also do the same for ‘Update Databases’.
If you have the time and patience it can’t hurt to go through all the items in the Online Updater menu (except Core Updater, we will address that in the next step) to make sure everything is as up to date as possible. I would also recommend performing this task from time to time in the future just so you don’t miss out on any new added features.
Install Cores/Emulators to RetroArch
In order to play games through RetroArch, you first need to install some emulators (referred to by RetroArch as cores). There are a huge number of emulators available in RetroArch, many for the same system, so to install all automatically would be overkill. For this reason you need to install all your chosen emulators manually. Click here for a list of recommended emulators for popular systems.
To install emulators, all you need to do is navigate to ‘Online Updater’ in the main menu of RetroArch, then select ‘Core Updater’. From here you will see a list of all the emulators available on RetroArch. Simply select which one you want and hit enter to install. Easy as that!
Add ROMs
Finally, in order to play games on RetroArch you need to install the games. Here I am assuming you have already acquired the ROMs you want, and have saved them to a folder. I have saved mine to a folder named ‘roms’ and have stored it in the route of my C:\ drive.
The ROMs you have saved will remain in the same folder going forward so it would be a good idea to select a folder that is easy to locate and easily accessible. Also I would recommend saving all your ROMs for a specific system in the same sub-folder. For example save all you Megadrive ROMs in a megadrive folder, all your GameBoy Advanced ROMs in a gba folder etc. It doesn’t matter what you name these folders, just make sure its descriptive and relates to the content.
When you know the location of your ROMs scroll all the way to the right of the main navigation in RetroArch until you reach the plus icon. Select ‘Scan Directory ‘ and hit enter. Now navigate to the folder that your desired ROMs are stored in, select it and then select ‘<Scan This Directory>’. If there are any ROMs in the folder they will be detected by RetroArch and installed. Make sure you only scan one system at a time and don’t try to cut corners by scanning the entire roms folder.
Now that you have RetroArch setup and all your ROMs installed it is recommended that you save your configuration. RetroArch generally saves your configuration, however in the past this functionality has proved to be a little flakey. To be certain that all your changes have been saved I like to save the configuration manually. To do this go to ‘Configurations’ in the RetroArch main menu. Hit ‘Save Current Configuration’ then go back to the main menu, quit RetroArch and then restart.
Load a Game and We’re Done!
That’s it! That’s all there is to it. Your ROMs should now all be installed and you should see your systems controller icon at the right of the main RetroArch menu. Select the controller icon to view a list of the games installed. Select the game you want to play and hit ‘Run’. If this is the first time you have played this ROM RetroArch will ask you which compatible core you want to use to play it. Select the one you want (if you have only installed one there will only be one in the list) then in the next menu, hit ‘Run’ again. Your game will now load.
When you are finished playing your game you can exit it by simultaneously pressing the select and start buttons on your controller. This will bring up the in game RetroArch menu where you can select the ‘Close Content’ option. There are also a few other options available in this menu for you to explore when you’re ready.
Related Questions
Where can I get ROMs from? Strictly speaking most ROMs are copyrighted and therefore illegal for the general public to download, however there are many public domain ROMs available as well. Zophar.net and pdROMs are a couple of reputable sites which are great resources for public domain ROMs.
What are the minimum requirements for running RetroArch? Even the most basic of todays PCs should be able to run RetroArch. This question is more associated to the type of ROMs you want to play. The most resource demanding ROMs tend to be those from the N64 but even these can run effectively on a machine with an Intel Pentium 3 700Mhz CPU, 2GB of RAM and an Nvidia GeForce256 graphics card (so any PC from the last 10 years). Historically the Raspberry Pi struggles with the N64 so if you’re looking to use a single board computer you may want to opt for one a little more powerful, such as the Odroid XU4.
What systems can I play on RetroArch? There are numerous retro machines available for you to play on RetroArch. These range from systems as old as the Atari 2600 right up until the PlayStation One and N64 and everything in between. You can view a complete list of the available emulators by viewing the Core Updater menu in RetroArch .
